
§Importing an sbt project into IntelliJ
Before importing, configure IntelliJ IDEA to use the most recent Scala plugin, which includes sbt support (Use this plugin regardless of whether you are using the Java or the Scala API).
Note The instructions on this page were verified with IntelliJ IDEA Community Version 2016.3.4. The procedures and screens can differ depending on the version, but the basic flow should be the same.
The following sections provide detailed steps for configuring IDEA and importing an sbt project:
§Add the Scala plugin
A number of Scala plugins are available. We recommend the plugin provided by JetBrains: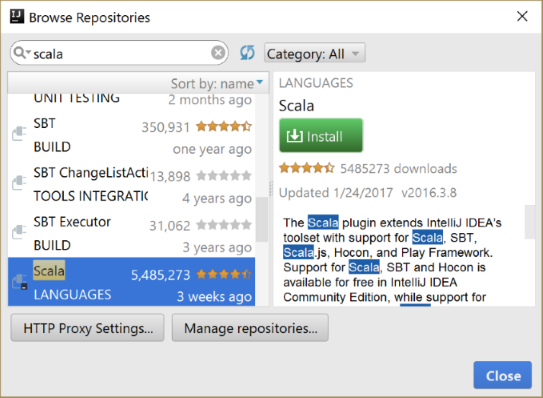
To verify or add the JetBrains Scala plugin, follow these steps:
- Open the Settings dialog:
- If you have a project open, from the File menu, select Settings.
- Otherwise, from the Welcome page Configure menu, select Settings.
The Settings (or Plugins) dialog will open. If you open the Settings, select Plugins.
- In the search box, enter
Scala.- If you have it installed, you will see an option to uninstall it.
- If you do not have it installed and it does not show in the list, click Browse repositories…. Scroll to find the appropriate plugin and click Install.
The dialog prompts you to restart IDEA.
Now you are ready to import your project.
§Import an sbt project
After you have an sbt build – one you created yourself or from a template – follow these steps to import the project into IntelliJ IDEA:
- From the Welcome Screen or File menu, select Open.
- Browse to and select the top-level folder of your sbt project, and click OK.
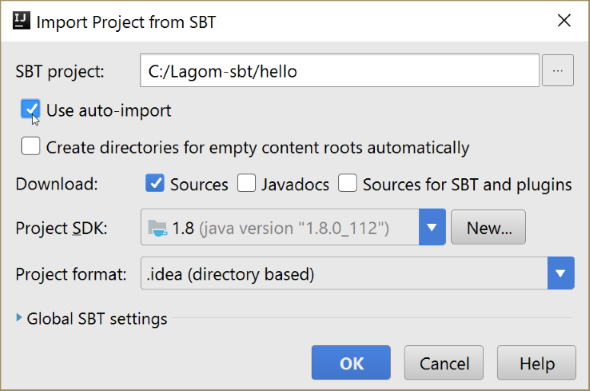
The Import Project from SBT dialog opens. -
For import options:
- Enable use auto-import.
- For Download options, enable Sources and disable Javadocs and Sources for SBT and plugins.
- For Project SDK, verify the version (JDK 1.8).
- Leave Project format: at the default, .idea (directory based). The screen should look something like this:
- Click OK.
The first time you import an sbt project, the SBT Project Data To Import screen opens and asks you to confirm the import. IDEA opens the project. The status bar shows sbt downloading dependencies and refreshing the project:
- You can build and run the project from the Terminal or create a Run Configuration as follows:
- From the Run menu, select Run.
- Click Edit Configurations….
- Click + (Add New Configuration).
- Select SBT Task.
- Name your configuration.
- In the Tasks field, enter
runAll. - Click Run.
A Run tab opens and you should see messages from the build, with the services starting up at the end:
- Verify that the services are indeed up and running by invoking the
helloservice endpoint from any HTTP client, such as a browser:
http://localhost:9000/api/hello/World
The request returns the message Hello, World!.